Life is SCIENCE. And Science has made life easy for Humans. The total linkage between them is only the use of new methods to achieve certain goals by secure ways.
This blog’s objectives are to provide information about the new hacks done in the society around us and to acknowledge the audience about having the safe use of it for there own benifits.
The new Drone Rules 2021 announced by the government on August 26 are a shot in the arm for the nascent remotely piloted aircraft (RPA) or drone industry in India. The liberalised policy depends on self-regulation and non-intrusive monitoring rather than enforced regulation. It replaces the Unmanned Aircraft System Rules 2021 that the Ministry of Civil Aviation had notified five months ago to test the waters.
The rules will replace the UAS (unmanned aircraft system) Rules 2021 issued on 12 March, the aviation ministry said in a statement.
According to the Drone Rules 2021, the requirement for several approvals have been abolished, including that for unique authorization number, a prototype identification number, certificate of manufacturing and airworthiness, certificate of conformance, certificate of maintenance, import clearance, acceptance of existing drones, operator permits, authorization of R&D organization, student remote pilot licence, remote pilot instructor authorization and drone port authorization.
no pilot licence will be required to operate micro drones used for non-commercial use, nano drones and for R&D organizations using such drones. The number of forms has also been reduced from 25 to 5 and types of fee sharply reduced from 72 to 4.
Civil Aviation Minister :
“This drone policy is historic. We want to create a strong drone ecosystem in India. This policy will eliminate all unnecessary operational and entry barriers,” civil aviation minister Jyotiraditya Scindia said at a news conference. “We aim to make India a hub for drones by 2030.”
Summary :
By reducing the number of fees and number of forms from 72 to 4 and 25 to 5, The Drone Rules, 2021 has reduced the compliance burden from drone startups significantly
The Drone Rules, 2021 has been drafted on the premise of trust, self-certification and non-intrusive monitoring, says the ministry of civil aviation
Welcoming the move, startups founders however indicate a slew of reforms that are yet to be introduced and are essential to the industry
Disclaimer:Lifehacksmumbai is publishing this article just for educational purposes and we don’t promote malicious practices. The information related to this article is from http://www.metasploit.com
Quick Start Guide
Creating a Project
Now that you’re familiar with the Projects page, let’s actually create a project.
A project contains the workspace, stores data, and enables you to separate an engagement into logical groupings. Oftentimes, you will have different requirements for the various subnets in an organization. Therefore, it may be efficient to have multiple projects to represent those requirements.
For example, you may want to create a project for the human resources department and another project for the IT department. Your requirements for these departments may vary greatly, so it would be logical for you to separate the targets into different projects. At the end of the engagement, you can generate separate reports for each department to perform a comparative analysis and present your findings to the organization.
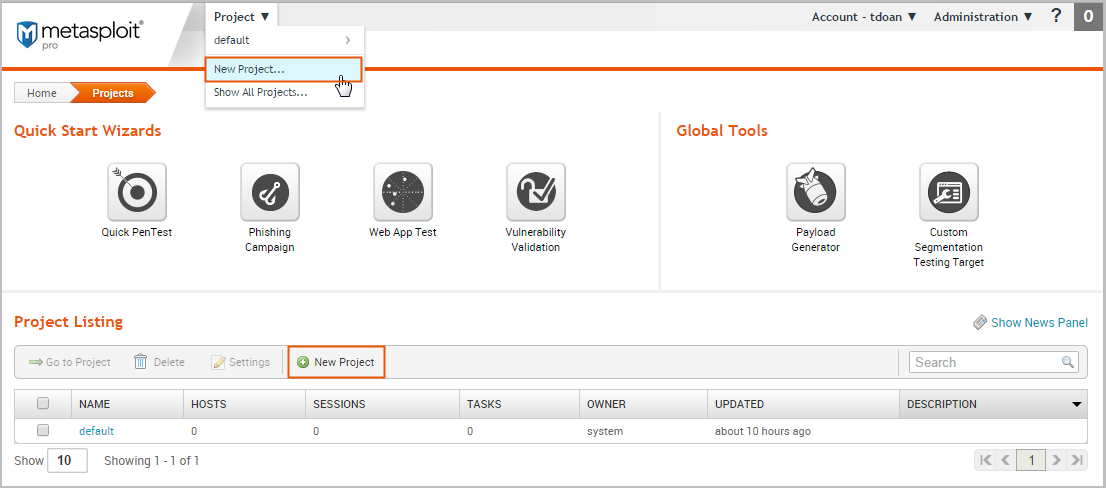
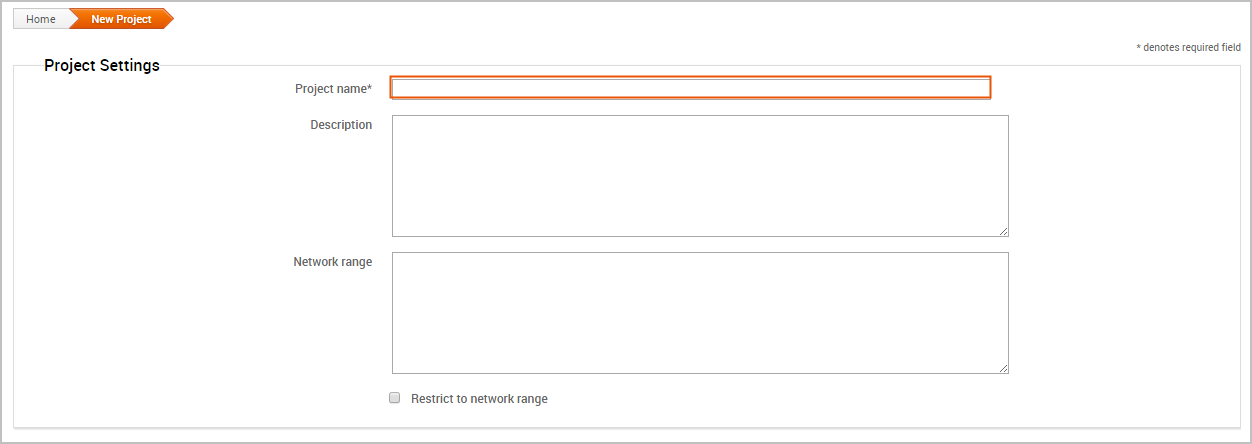
Creating a project is easy. You can click on the New Project button on the Projects page or you can select Project > New Projectfrom the global toolbar.
When the New Projects page appears, you only need to provide a project name. If you want to customize the project, you can also add a description, specify a network range, and assign user access levels.
Want to learn more about projects? Check out this page.
Getting Target Data
The next thing you want to do is add data to your project. There are a couple of ways you can do this:
Run a discovery scan
Import data you already have
Scanning Targets
Scanning is the process of fingerprinting hosts and enumerating open ports to gain visibility into services running within a network. Scanning enables you to identify the active systems with services that you can communicate with so that you can build an effective attack plan. Metasploit has its own built-in discovery scanner that uses Nmap to perform basic TCP port scanning and gather additional information about the target hosts .
By default, the discovery scan includes a UDP scan, which sends UDP probes to the most commonly known UDP ports, such as NETBIOS, DHCP, DNS, and SNMP. The scan tests approximately 250 ports that are typically exposed for external services and are more commonly tested during a penetration test.
During a discovery scan, Metasploit Pro automatically stores the host data in the project. You can review the host data to obtain a better understanding of the topology of the network and to determine the best way to exploit each target. Oftentimes, the network topology provides insight into the types of applications and devices the target has in place. The more information that you can gather about a target, the more it will help you fine-tune a test for it.
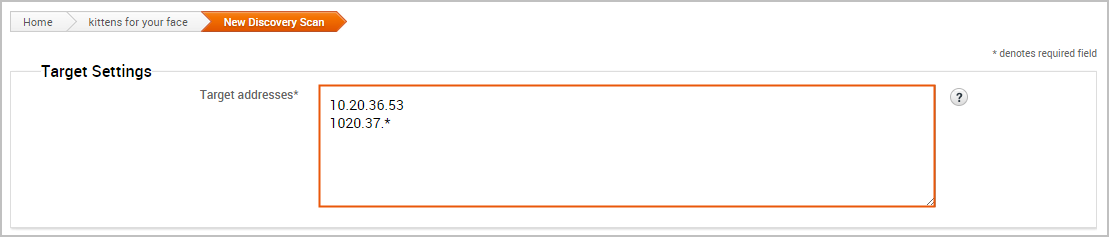
Running a discovery scan is simple. From within a project, click the Scan button.
When the New Discovery Scan form appears, enter the hosts you want to scan in the Target addresses field. You can enter a single IP address, an IP range described with hyphens, or a standard CIDR notation. Each item needs to appear on a newline.
You can run the scan with just a target range; however, if you want to fine-tune the scan, you can configure the advanced options. For example, you can specify the hosts you want to exclude from the scan and set the scan speed from the advanced options.
Want to learn more about discovery scans? Check out this page.
Importing Data
If you are using a vulnerability scanner, you can import your vulnerability report into a Metasploit project for validation. The imported vulnerability data also includes the host metadata, which you can analyze to identify additional attack routes. Metasploit supports several third-party vulnerability scanners, including Nessus, Qualys, and Core Impact.
You can also export and import data from one Metasploit project into another. This enables you to share findings between projects and other team members.
To import data into a project, click the Import button located in the Quick Tasks bar. When the Import Data page appears, select either the Import from Nexpose or Import from File option. Depending on the option you choose, the form displays the options you need to configure to import a file.
For example, if you choose to import from Nexpose, you will need to choose the console you want to use to run a scan or import a site. If you choose to import a file, you will need to browse to the location of the file.
To see a full list of supported import types or to learn more about importing, check out this page.
Viewing and Managing Host Data
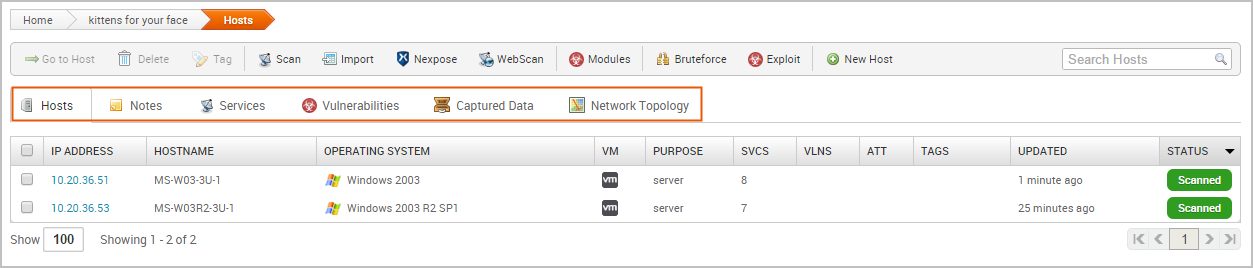
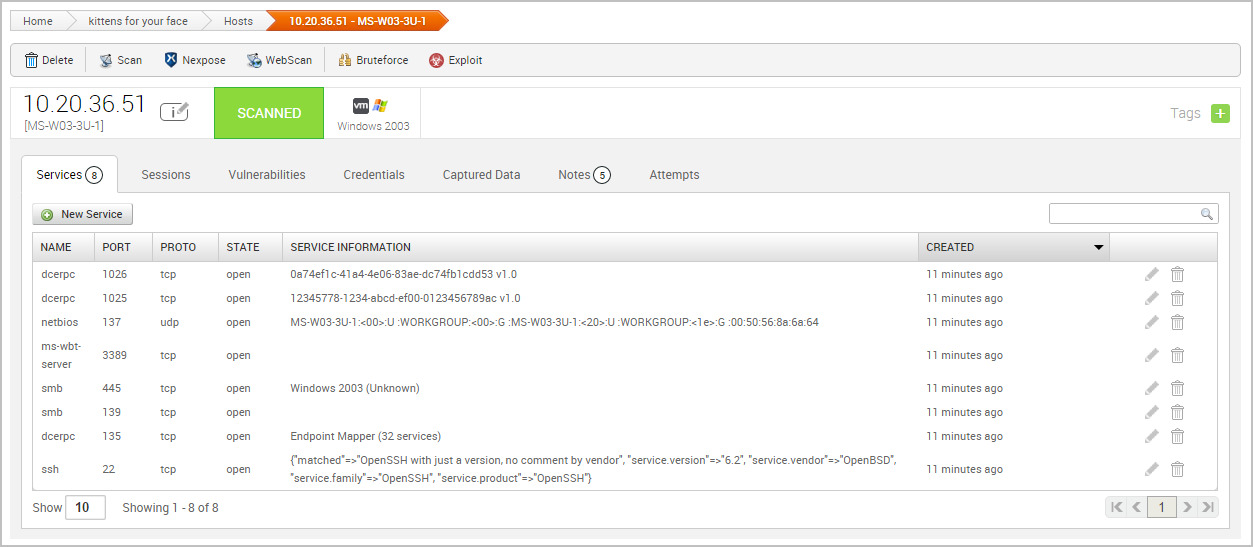
You can view host data at the project level or at the host level. At the project level, Metasploit provides a high-level view of all hosts that have been added to the project. To access the project view, select Analysis > Hosts. The project view initially shows the Hosts list, which displays the fingerprint and enumerated ports and services for each host. You can also view all the notes, services, vulnerabilities, and captured data for the project. To access these other views, click on their tabs from the project view.
To view the granular details for a host, you can click the host’s IP address to access the single host view. This is a good way to drill down to see the vulnerabilities and credentials for a particular host.
Running a Vulnerability Scan
After you add target data to your project, you can run a vulnerability scan to pinpoint security flaws that can be exploited. Vulnerability scanners leverage vulnerability databases and checks to find known vulnerabilities and configuration errors that exist on the target machines. This information can help you identify potential attack vectors and build and attack plan that will enable you to compromise the targets during exploitation.
The integration with Nexpose enables you to launch a vulnerability scan directly from the Metasploit web interface. A Nexpose scan identifies the active services, open ports, and applications that run on each host and attempts to identify vulnerabilities that may exist based on the attributes of the known services and applications. Nexpose discloses the results in a scan report, which you can share with Metasploit for validation purposes.
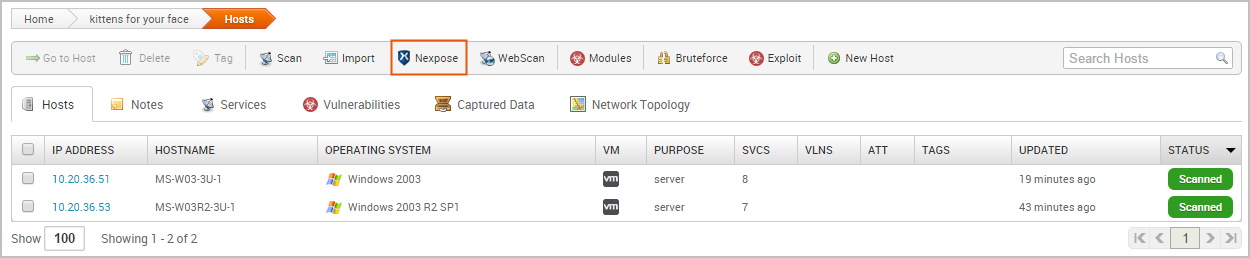
To run a Nexpose scan, click the Nexpose button located in the Quick Tasks bar.
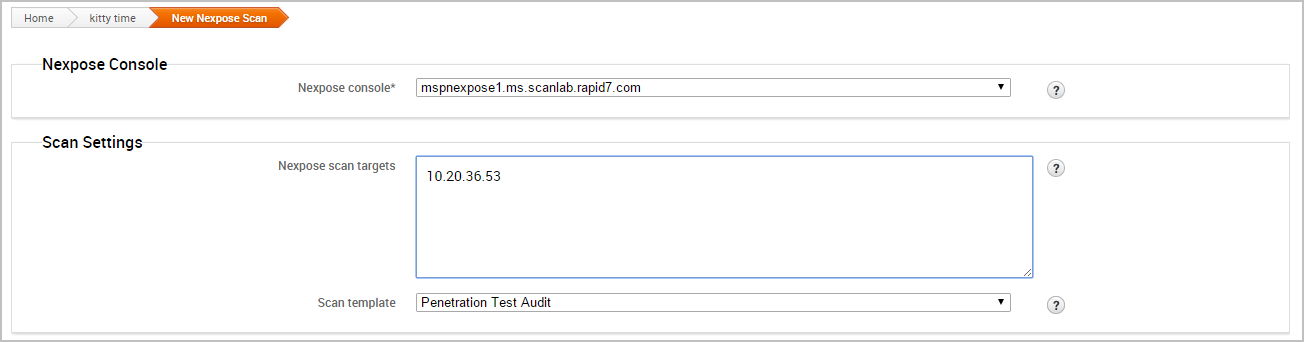
When the Nexpose configuration form appears, you need to configure and select the console you want to use to perform the scan. Similarly to a discovery scan, you need to define the hosts you want to scan. You’ll also need to choose one of the available scan templates, which defines the audit level that Nexpose uses. For more information on scan templates, check out the Nexpose documentation.
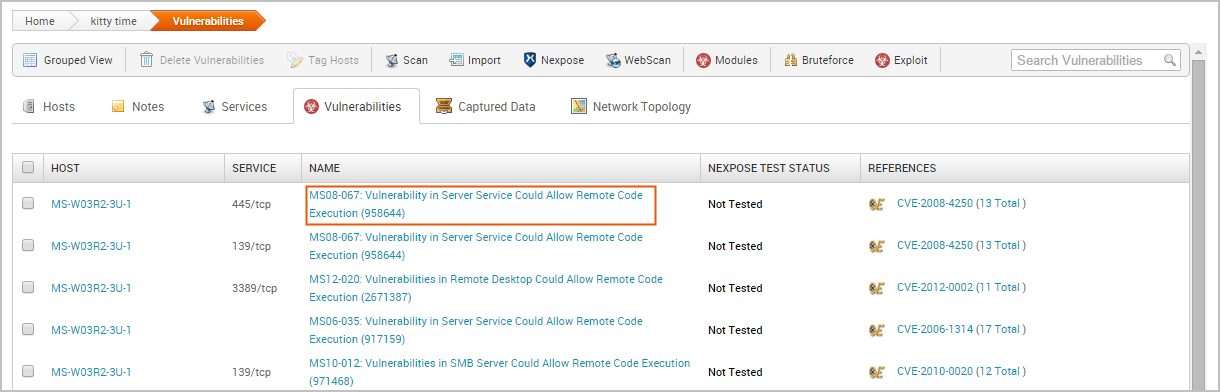
To view all potential vulnerabilities that found by Nexpose, select Analysis > Vulnerabilities. You can click on the vulnerability name to view the modules that can be used to exploit the vulnerability.
This information becomes handy in the next phase of the pentest: exploitation.
Vulnerability scanners are useful tools that can help you quickly find potential security flaws on a target. However, there are times when you may want to avoid detection and limit the amount of noise you create. In these cases, you may want to run some auxiliary modules, such as the FTP, SMB, and VNC login scanners, to manually identify potential vulnerabilities that can be exploited. Manual vulnerability analysis is considerably more time consuming and requires research, critical thinking, and in-depth knowledge on your part, but it can help you create an accurate and effective attack plan.
Finding and Exploiting Vulnerabilities the Easy Way
The easiest way to scan and check for vulnerabilities is through the Vulnerability Validation Wizard, which automates the validation process for Nexpose and Metasploit Pro users. The wizard provides a guided interface that walks you through each step of the validation process—from importing Nexpose data to auto-exploiting vulnerabilities to sending the validation results back to Nexpose.
If you don’t have access to Nexpose and/or Metasploit Pro, the validation process requires manual analysis of the vulnerabilities. Manual validation requires a bit more legwork, but provides much more control over the vulnerabilities that are targeted.
For more information on vulnerability validation, check out this page.
Exploiting Known Vulnerabilities
After you have gathered information about your targets and identified potential vulnerabilities, you can move to the exploitation phase. Exploitation is simply the process of running exploits against the discovered vulnerabilities. Successful exploit attempts provide access to the target systems so you can do things like steal password hashes and download configuration files. They also enable you to identify and validate the risk that a vulnerability presents.
Metasploit offers a couple different methods you can use to perform exploitation: auto-exploitation and manual exploitation.
Auto-Exploitation
The auto-exploitation feature cross-references open services, vulnerability references, and fingerprints to find matching exploits. All matching exploits are added to an attack plan, which basically identifies all the exploits that are can be run. The simple goal of auto-exploitation is to get a session as quickly as possible by leveraging the data that Metasploit has for the target hosts.
To run auto-exploitation, click the Exploit button located in the Quick Tasks bar.
At a minimum, you’ll need to provide the hosts you want to exploit and the minimum reliability for each exploit. The minimum reliability can be set to guarantee the safety of the exploits that are launched. The higher the reliability level, the less likely the exploits used will crash services or negatively impact a target. For a description of each module ranking, check out this page.check out this page.
Manual Exploitation
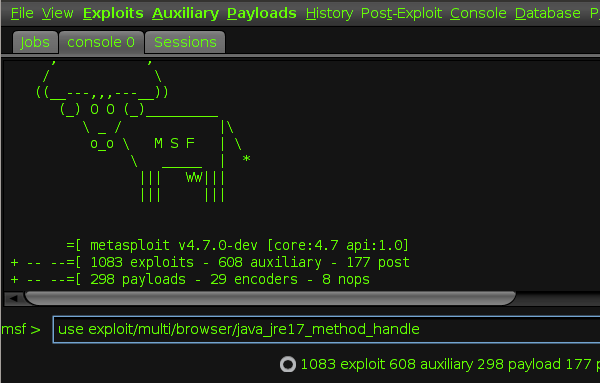
Manual exploitation provides a more targeted and methodical approach to exploiting vulnerabilities. It enables you to run select individual exploits one at a time. This method is particularly useful if there is a specific vulnerability that you want to exploit. For example, if you know that the SMB server on a Windows XP target does not have the MS08-067 patch, you may want to try to run the corresponding module to exploit it.
To search for modules, select Modules > Search and enter the name of the module you want to run. The best way to find an exact module match is to search by vulnerability reference. For example, if you want to search for ms08-067, you can either search for ‘ms08-067’. You can also search by the module path: exploit/windows/smb/ms08_067_netapi.
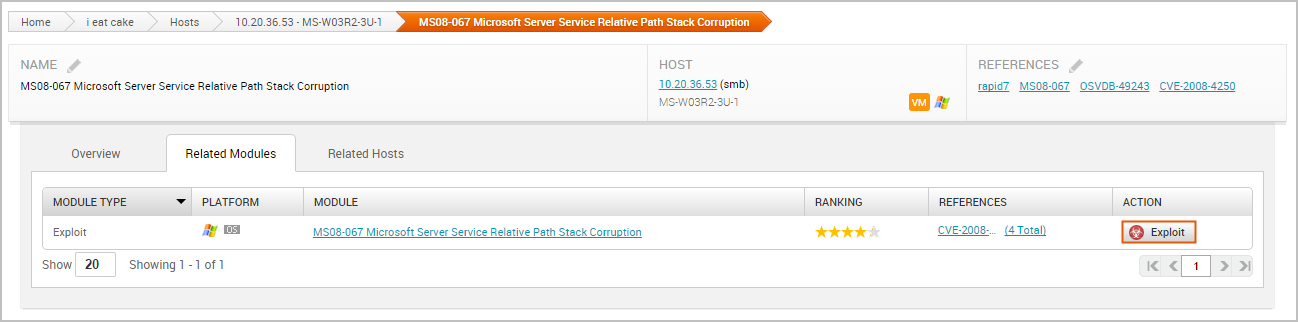
One of the easiest ways to find an exploit for a vulnerability is directly from the vulnerability page. To view all vulnerabilities in the project, select Analysis > Vulnerabilities. You can click on the vulnerability name to view the related modules that can be used to exploit the vulnerability.
The single vulnerability view shows a list of the exploits that can be run against the host. You can click the Exploit button to open the configuration page for the module.
Configuring Common Exploit Module Settings
Each module has its own set of options that can be customized to your needs. There are too many possibilities to list here. However, here are some options that are commonly used to configure modules:
Payload Type – Specifies the type of payload that the exploit will deliver to the target. Choose one of the following payload types:
Command – A command execution payload that enables you to execute commands on the remote machine.
Meterpreter – An advanced payload that provides a command line that enables you to deliver commands and inject extensions on the fly.
Connection Type – Specifies how you want your Metasploit instance to connect to the target. Choose one of the following connection types:
Auto – Automatically uses a bind connection when NAT is detected; otherwise, a reverse connection is used.
Bind – Uses a bind connection, which is useful when the targets are behind a firewall or a NAT gateway.
Reverse – Uses a reverse connection, which is useful if your system is unable to initiate connections to the targets.
LHOST – Defines the address for the local host.
LPORT – Defines the ports that you want to use for reverse connections.
RHOST – Defines the target address.
RPORT – Defines the remote port you want to attack.
Target Settings – Specifies the target operating system and version.
Exploit Timeout – Defines the timeout in minutes.
Post-Exploitation and Collecting Evidence
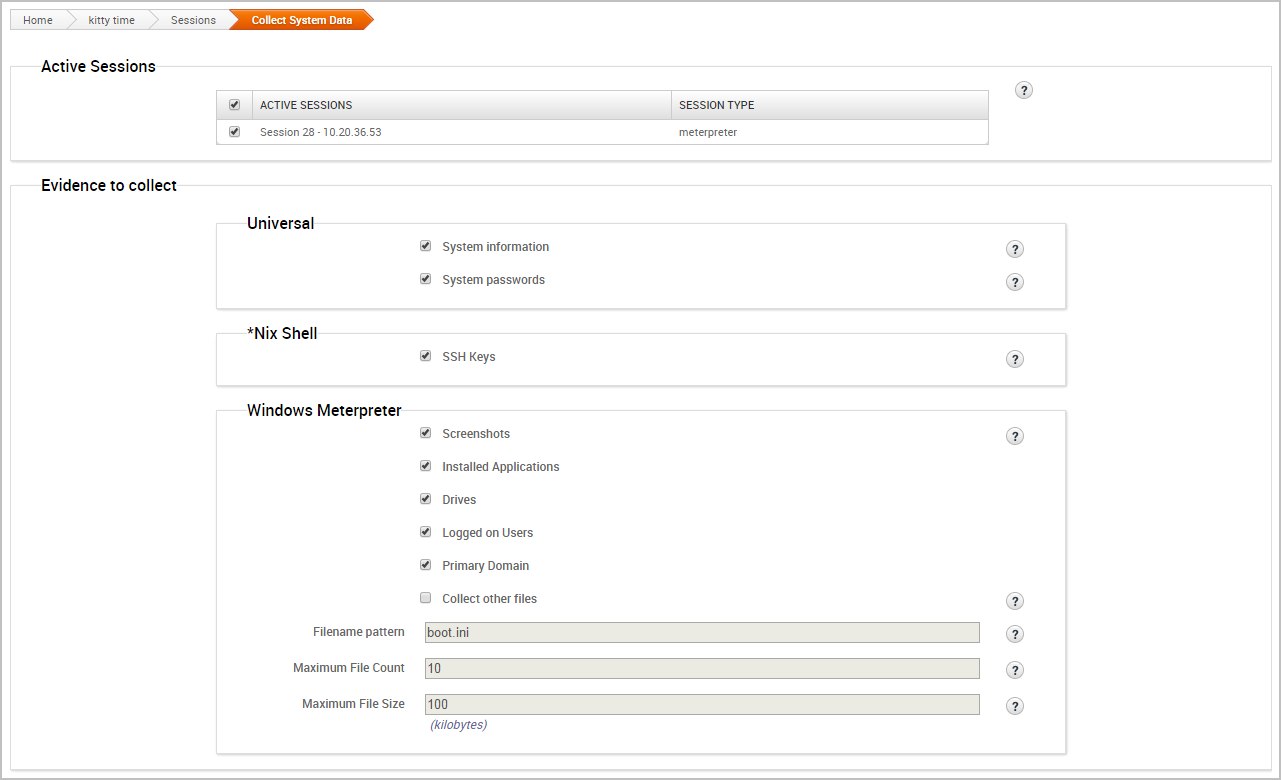
Any exploit that successfully takes advantage of a vulnerability results in an open session you can use to extract information from a target.The real value of the attack depends on the data that you can collect from the target, such as password hashes, system files, and screenshots and how you can leverage that data to gain access to additional systems.
To view a list of open sessions, select the Sessions tab. Click on the session ID to view the post-exploitation tasks that can be run against the host.
To collect evidence from an exploited system, click the Collect button.
A list of all open sessions displays and shows you the type of evidence that can be collected.
Bruteforcing and Reusing Passwords
One of the most popular ways to gain access to a target is through the use of password attacks. You can conduct password attacks by using Bruteforce or Reusing Credentials.
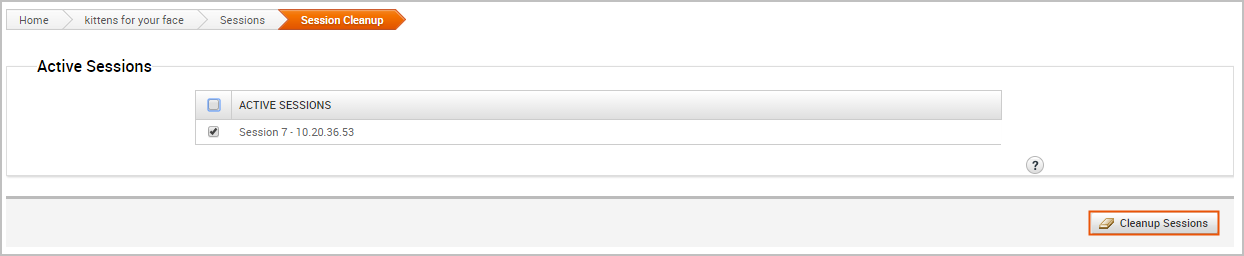
Cleaning Up Sessions
When you are done with an open session, you can clean up the session to remove any evidence that may be left behind on the system and to terminate the session. To clean up a session, go to the Sessions page and click the Cleanup button.
When the Session Cleanup page appears, select the sessions you want to close and click the Cleanup Sessions button.
Generating a Report
At the end of the pentest, you’ll want to create a deliverable that contains the results of your pentest. Metasploit provides a number of reports that you can use to compile test results and consolidate data into a distributable and tangible format. Each report organizes your findings into relevant sections, displays charts and graphs for statistical data, and summarizes major findings.
For more information on reports, check out this page.
Additional Resources
That was a lot of information that we just covered. If you want to learn more about specific things, visit the online help.
Now that you’re familiar with some of the common tasks in Metasploit Pro, check out some of the other tasks you can perform:
Want to automate your tasks? Check out Task Chains.
Interested in bruteforce attacks? Go here to learn more.
Disclaimer:Lifehacksmumbai is publishing this article just for educational purposes and we don’t promote malicious practices.
Metasploit | Best Hacking Tools Of 2018
Rather than calling Metasploit a collection of exploit tools, I’ll call it an infrastructure that you can utilize to build your own custom tools. This free tool is one of the most popular cybersecurity tool around that allows you to locate vulnerabilities at different platforms. Metasploit is backed by more than 200,000 users and contributors that help you to get insights and uncover the weaknesses in your system.
This slideshow requires JavaScript.
This top hacking tool package of 2017 lets you simulate real-world attacks to tell you about the weak points and finds them. As a penetration tester, it pin points the vulnerabilities with Nexpose closed–loop integration using Top Remediation reports. Using the open source Metasploit framework, users can build their own tools and take the best out of this multi-purpose hacking tool.
Supported platforms and download:
Metasploit is available for all major platforms including Windows, Linux, and OS X.
An ethical hacker is the ultimate security professional. Ethical hackers know how to find and exploit vulnerabilities and weaknesses in various systems just like a malicious hacker . In fact, they both use the same skills; however, an ethical hacker uses those skills in a legitimate, lawful manner to try to find vulnerabilities and fix them before the bad guys can get there and try to break in.
An ethical hacker’s role is similar to that of a penetration tester, but it involves broader duties. They break into systems legally and ethically. This is the primary difference between ethical hackers and real hackers (the legality of Hacks)
According to the EC-Council, the ethical hacking definition is “an individual who is usually employed with an organization and who can be trusted to undertake an attempt to penetrate networks and/or computer systems using the same methods and techniques as a malicious hacker.”
The role of an ethical hacker is important since the bad guys will always be there, trying to find cracks, backdoors, and other secret ways to access data they shouldn’t. In fact, there’s even a professional certification for ethical hackers: the Certified Ethical Hacker